
Kurti and Neckline Design 2023
Kurti Design:
Kurti is a type of traditional Indian garment that is typically worn by women. It is a long tunic that falls either above or below the knee and is often paired with leggings or churidar pants. Kurtis can be made from a variety of fabrics, including cotton, silk, georgette, and chiffon, and can be decorated with embroidery, beadwork, or prints.
Kurtis are a versatile garment and can be worn for a variety of occasions, from casual outings to formal events. They are comfortable to wear in hot weather and can be styled in a variety of ways, from simple and elegant to bold and colorful.
In recent years, kurtis have become increasingly popular outside of India, and are now worn by women around the world as a fashionable and comfortable alternative to western-style clothing. They are available in a wide range of styles, from traditional to contemporary, and can be found in many different colors and patterns.
Kurti fashion has evolved over the years to reflect changing trends and styles. Today, there are many different styles of kurtis available, ranging from traditional to contemporary, and they are often paired with different types of bottoms such as leggings, palazzos, or jeans. Here are some popular trends in kurti fashion:
Embroidery: Kurtis with intricate embroidery, particularly in traditional Indian designs, are a popular fashion trend. Embroidery adds a touch of elegance and sophistication to the garment, and can be done in a variety of colors and styles.
Prints: Kurtis with bold prints, such as florals, geometric patterns, or abstract designs, are another popular trend. These can be paired with plain bottoms to make the kurti the focal point of the outfit.
Layering: Layering kurtis is another trend that has gained popularity in recent years. This involves wearing multiple kurtis of varying lengths and styles together, creating a unique and eye-catching look.
Contemporary styles: In addition to traditional designs, there are many contemporary styles of kurtis available that reflect current fashion trends. For example, kurtis with off-shoulder necklines or cut-out details are a popular choice for younger women.
Overall, kurti fashion is constantly evolving, and there is a wide variety of styles and designs available to suit different tastes and occasions. Layering kurtis is another trend that has gained popularity in recent years. This involves wearing multiple kurtis of varying lengths and styles together, creating a unique and eye-catching look.
Contemporary styles: In addition to traditional designs, there are many contemporary styles of kurtis available that reflect current fashion trends. For example, kurtis with off-shoulder necklines or cut-out details are a popular choice for younger women.
Overall, kurti fashion is constantly evolving, and there is a wide variety of styles and designs available to suit different tastes and occasions.

Neckline Design:
A neckline is the shape or design at the top of a garment that surrounds the neck and shoulders. Necklines can vary widely in style and design, and can significantly impact the overall look of a garment.
Here are some common types of necklines:
Crew Neck: A crew neck is a rounded neckline that sits at the base of the neck. It is a classic and versatile style that is commonly used in t-shirts and sweatshirts.
V-Neck: A V-neck is a neckline that dips down in the front, creating a V-shape. It is a popular style for blouses, dresses, and t-shirts, and can be designed to be more or less plunging.
Boat Neck: A boat neck is a wide neckline that extends horizontally across the collarbones. It is often used in tops and dresses to create a sophisticated, elegant look.
Scoop Neck: A scoop neck is a rounded neckline that dips down lower than a crew neck. It can be shallow or deep and is often used in t-shirts and tank tops.
Halter Neck: A halter neck is a style where the fabric wraps around the neck, leaving the shoulders and upper back exposed. It is commonly used in dresses and tops for a more formal or dressy look.
Off-the-shoulder: An off-the-shoulder neckline exposes the shoulders and upper chest area. This style is commonly used in dresses and tops for a romantic, feminine look.
There are many other neckline styles as well, each with their own unique look and purpose. The choice of neckline can depend on factors such as the occasion, the type of garment, and personal style preferences..
.jpg)
Kurtis can have a variety of different neckline designs, and the choice of neckline can significantly impact the overall look and style of the garment. Here are some popular neckline designs for kurtis:
Round Neckline: A round neckline is a classic and versatile style that is rounded and sits at the base of the neck. It is commonly used in kurtis and can be designed to be shallow or deep.
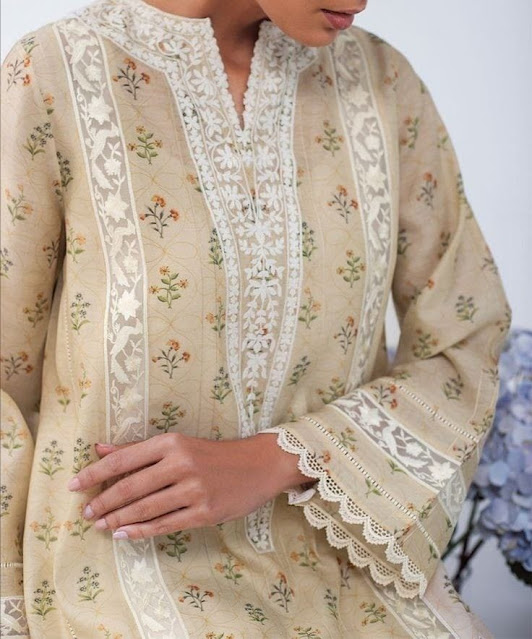
V-Neckline: A V-neckline is a style that dips down in a V-shape at the front of the garment. It is a popular style for kurtis and can be designed to be more or less plunging.
Boat Neckline: A boat neckline is a wide, horizontal neckline that sits across the collarbones. It is often used in kurtis to create a sophisticated, elegant look.
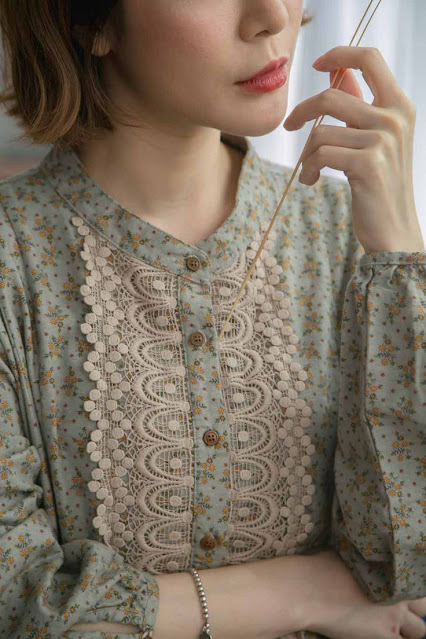
Mandarin Collar: A mandarin collar is a short, stand-up collar that is commonly used in traditional and contemporary kurtis. It is a popular style for formal and semi-formal occasions.
Square Neckline: A square neckline is a flattering style that is square-shaped and sits on or slightly above the collarbone. It is often used in kurtis to create a feminine and elegant look.
Collared Neckline: A collared neckline is a style that features a traditional shirt collar. It is a popular style for formal and semi-formal kurtis, and can be designed with different collar shapes and sizes.

I'm going to come down by half of an inch normally I'll go down by one inch but again because we are working on the actual fabric I am just adding removing half inch from everything so that I'll be able to use them to stitch it down together later so I came down by half of an inch here so this is what we have the next thing is you're going to divide your bust measurement.
By six and add 1.5 to whatever that gives you so that gave me seven inches and I just made a point there so I'm going to connect from this shoulder here down to this point here like this and then I'll extend it to the side as well so the next thing I'm going to do is on this line here I'm going to divide my burst measurement by four so go ahead and divide your boss measurement by four.
Traditional fashion can refer to the clothing styles and designs that are representative of a particular culture or ethnicity. It can vary widely depending on the country, region, and historical era, but often incorporates elements such as traditional fabrics, colors, patterns, and techniques.
Some examples of traditional fashion from around the world include:
Sari: The sari is a traditional garment worn by women in India and other South Asian countries. It consists of a long piece of fabric draped around the body in various styles, often featuring intricate patterns and designs.
Kimono: The kimono is a traditional Japanese garment that consists of a long robe with wide sleeves, worn with a sash or obi belt. It is often made from silk or other traditional fabrics, and can feature intricate embroidery and patterns.
Dashiki: The dashiki is a traditional West African garment that is typically made from colorful, patterned cotton fabric. It is a loose-fitting tunic that can be worn by both men and women.
Kente Cloth: Kente cloth is a traditional fabric from Ghana that is handwoven on a loom. It features bright colors and intricate patterns, and is often used to create garments such as dresses, skirts, and shirts.
Hanbok: The hanbok is a traditional Korean garment that consists of a full skirt and a short jacket or blouse. It is often made from silk or other traditional fabrics, and can feature delicate embroidery and other decorative elements.

I'm marking points there, and after that you should simply connect this into the armhole line with a curve, as you see me doing here. Now, on this bus line here, just like you did on this line here, your bus measurement divided by four, as we've already marked it here, so I'm going to go ahead and add one and a half inches to that for stitching allowance, and I also do the same thing on the bust line as well, so the chest line on the bust line.
I'm placing the front with the right sides facing each other, making sure that the shoulders match up perfectly, just as you see me doing here, making sure that the shoulder and armhole match up perfectly so once you're done arranging it like this, you're going to go over to the sewing machine and you're going to go ahead and stitch down this shoulder here and here so it's all stitched down and I went ahead to iron it out and this is what I have so the next thing we'r going to off.
Like my own, you will need one and a half yards, which is what I'm using to make this dress at the moment. I chose a straight sleeve rather than one with a rubber under, so I'm just going to cut out the sleeve. I already have a video on the channel on how to draught a basic sleeve, so this is just an easy way I do it.

a smudge along the centre of my sleeve Guys, it's all stitched down and I also went ahead to iron it out, and this is how it looks, so I went ahead to do the same thing for the other side as well. Now the next thing we want to go ahead and do is turn this over to the right to the wrong side, sorry we're going to tu.
This is what it looks like after I finished stitching down the sides from the armhole area all the way to the ends of the dress. The next thing we're going to go ahead and do now is we're going to work on this neckline so I am just going to fold it in half. I forgot to mention to you guys that I actually also added one and I have been stitching other ones to the sleeve so I'm going to use that one-and-a-half inch now to stitch the sides.
I've finished sewing the neckline, and this is how nice it looks. If you want to add depleting like it is on the yellow, go ahead and fold in a fabric that is about four inches wide. If it is four inches wide, that means that by the time you fold this into two, you will have two inches. So you just go ahead and make the gates all the way around this area here. However, for me, I'm not going to be using that I'm not making.


That will appear quite good. You want to work on the ropes to use and tie this around your waist next. One thing I had to do on the side is I initially forgot I had to make a hole here on the waist for the rope to pass through but go ahead and make a tiny rope on one side of the waist for your rope to pass through so when you're two with that now it's finished. Trust me, it's better with the pleats.
So, guys, I cut out four pieces of this specific rope, and we will measure it later, so I'm just pinning these two together to make one because I want it to be long. When you're two pinning it down, use your one straight fabric if you have it, but because I'm working with a small piece, I'm joining this. This is for one side, so let's check the measurement. This side here, I have three inches, so that means that I need to

the joining right there so I proceeded to sew down one end and leave the other open so from this end I stitched down I'm going to just use my scissors to put it in and bring out the rope and after I was done with that this is what I had I proceeded to iron in my ropes and it came out really nicely so now we are going to place our ropes on these points that we have here so you're going to place your rope like this on this side here and you're just going
I'll go over to the sewing machine and sew it down here, and I'll do the same for the other side as well. Once I was done, look at how nicely it turned out. Next, we'll pass one of the ropes—the one on the opposite side—through the hole we made earlier. You can see that we'll pass it through this spot like this, and the other rope will follow behind it and come across to cover it.
This is a lovely image of how mine seemed when I finished constructing it. I sincerely hope that this lesson will be helpful to you. Thank you very much for reading.
stylish
ReplyDelete