
Full Face of ULTA Makeup!
I like for the skincare to absorb into the skin so by the time we're done with eyeshadow we can jump right into the complexion also I want to say I used the LMS Pro collagen cleansing balm before this to cleanse your skin with y'all read me use it all the time so I decided to do that off camera but yeah even the LMS cleansing balm you can get at Ulta and of course as you read here I bring the skincare down the neck and onto the chest and shoulders thank you next up I'm taking a piece of Scotch tape and placing this exactly.
I'm going to be creating my winged liner later on following that lower lash line straight upwards towards the end of her brow and if you noticed I kind of dabbed this onto the back of my hand first and that's so it's not too sticky on her skin so to start on eye makeup I'm using this Maybelline ongoing drama black gel eyeliner and placing this along her outer lash line this isn't something you want to stress yourself out about getting perfect because as you'll read here I'm buffing it out anyway with an eyeshadow blending brush.
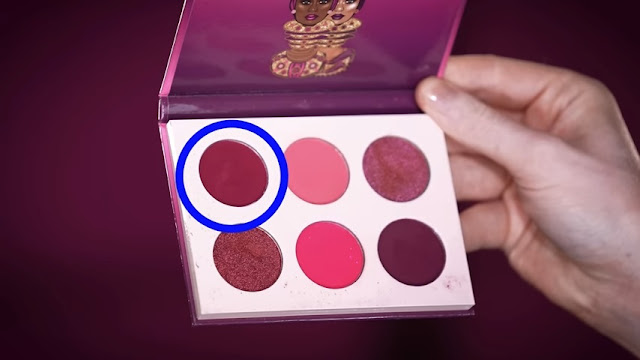
we'll come back later to get a crisp line but the purpose of this is to serve as a base for the eyeshadows we place on top the first Shadow I'm using is this one from the berries eyeshadow palette by Juvia's place and I'm pressing this right on top of that black gel liner again nothing you know perfect but just a little something to start building up the color story we're going for today next I'm taking this shade from the same eyeshadow palette and using this as our transition shade applying it right to the edge of that first Shadow.

then diffusing it outwards to create that Smoky blew out effect foreign once we have this Blended I'm then taking the abh Magic Touch concealer and using this to cut the crease what I like to do is I have my client look straight ahead so I have an idea of where I want to create the crease I'll then have her look down and I'll go in to lay the concealer down before I use my finger to kind of you know blend and buff at the edges into the eye shadow to set that concealer.
I'm taking this shade from the violets eyeshadow palette by Juvia's place and placing this right on top of that concealer while it's still wet that's crucial I don't set the concealer or anything with a translucent powder first I just get right in there with this eyeshadow because the wet concealer you read will really grip onto this pigment and give us the color payoff we're looking for once.
I have this applied I'm then taking this elf liquid glitter eyeshadow in the shade Purple Rain and applying this to the center of the lid and then diffusing it up and out with my finger and pressing motions you can totally skip this step if you want more of a matte finish but hey I figured at this point if I'm going to do this dramatic of an eye look it might as well go for it.
I'm glad I did glitter is always a good idea or at least in my world I think it is and then here what I'm doing is I'm taking that very first deep burgundy shade we used and placing this right along that cut crease with an eyeliner brush to give it more Dimension and structure now to be honest I have no idea guys what I'm doing here.
you know me well enough by now to know that this kind of structured intricate eye looks is not my strong suit so I'm kind of taking you along the journey with me here there's no plan I have in mind here I'm just going with the flow so you'll notice I go back and forth a lot add a little detail there fix a little something over there and eventually we'll make it to the finish line now you read by removing the tape we're left with a really crisp and clean bar and should I want to clean up any fallout.
I can do so with a makeup wipe for foundation I'm using the Tarte face tape foundation in the shade Rich Neutral and I'm applying this on with a sponge and pressing motions I think this is a really nice shade for Acacia because it has warm undertones to it that helps you know cancel out any hyperpigmentation or darkness in specific areas for example especially when working on women of color or men you know it doesn't matter it's very common for there to be a hint of hyperpigmentation around the mouth and Chin area if you use two neutral of a foundation or concealer on top what's going to happen.
you're going to get a grayish cast come through oh real quick here I'm taking the Too Faced to pour in this way concealer in the shade Sable and using this to Contour around the perimeter of the face below the cheekbones and jawline before I blend it in with our sponge now what was I just talking about the foundation oh undertones so if you have a deeper skin tone if you're working on a client who does incorporate warmer's home is often going to be your best friend think Coral Peach apricot and if you want to take it one step further you could color correct beforehand and all that but it's really not necessary in this case I'm not looking to get too caught up with a complexion for this look.

I just want to make it out alive with this eye makeup because we still have a lot to do and you know I'm going to be holding on to the edge of my seat trying to get through that eyeliner later on so in the meantime I'm going to enjoy the next minute or so of this blending footage and I'll be right back thank you already so now that we have the Contour Blended I'm taking this elf camo color corrector and mixing in the smallest amount to our abh concealer which will give it a warmer tone and I'm applying it to the inner part of the under eye there before blending it up and out with our sponge a couple things here.
first is we got to talk about the tone we created I'm sticking to that warm cinnamon undertone that's going to be quite flattering for her and another thing is notice how far up I'm blending this I'm making this travel almost up to the hairline bringing it up right there underneath the eye shadow this is going to give us a really clean lifted look to the cheekbone that's kind of on brand for this style of eye makeup here's the thing clearly we're not going for a no-makeup makeup look right we're going Glam here so you may want to alter this a little bit depending on what you feel works for your face shape on Acacia.
though the reason I made these creative choices in terms of product and placement is that she owns it right she can rock a full face of makeup not because she needs to No One Needs makeup but because she wants to she loves a natural look as we've done together in the past but she also loves a Glam she has the confidence for it and that's what it comes down to so I say all that to say you can take bits and pieces of this and tailor it to your routine and what makes you feel the most confident.
so yeah anyway I've taken what's left of the concealer applied a bit to the center of the forehead blended it out and now I'm mixing these two abh powders in the shades of golden orange and deep Peach and using these to set the under eye concealer into place really pressing that powder in with a powder puff from the inner corner all the way up that's another thing about this eyeshadow placement because we have such a clean line to work with we can use that almost as a blueprint for all the other steps.
we know where to apply the powder we know where to apply bronzer eyeliner blush and all that so even though I still prefer and always will prefer doing complexion before eye makeup I do read why others may prefer doing eye makeup first it helps take some of the guesswork out of it and it's especially helpful for someone who experiences a lot of Fallout with their eyeshadow alright next I'm using this benefit hula bronzer in the shade toasted and using this to reinforce the cream of Contour we earlier applied I love this bronzer I love all the benefit bronzers in fact.

I think they did such a great job with this formula the tones just you know everything I've used the original Hula bronzer shade on myself for years and it wasn't until a client recommended this shade that I decided to buy it and try it out, in this case, I'm using it more so to lightly set the cream of Contour we had done earlier I'm not wanting a dramatic difference the Contour had done most of that work for me I'm just looking for a little something that adds to that soft sculpted look as we read here.
I'm using the loose setting powder from earlier to bake with along the under eye and jawline which will further set and highlight these areas later on once we wipe this powder off but in the meantime, I'm using this Juvia's Place blush in the shaded volume 6 and placing this right at the apples of her cheeks this is such a beautiful beautiful blush shade Juvia's place is another brand that absolutely kills it with their formulas, in fact, I'll go as far as to say that 80 percent of the time.
I'm walking into an Ulta it's because of this brand I think they do a fantastic job with their formulas with their products specifically their powder pigments the eyeshadows blushes bronzers powder foundations all that just very very good so once I have this applied I'm then heading back to oh goodness gracious oh this gives me so much anxiety okay okay be professional Spencer I'm heading back to my Maybelline eyeliner from earlier to create a sharp winged eyeliner following that exact line from our eye shadow and bringing this liner all the way forward to the inner corner of the eye.
Also run it along the lower lash line but I'm gonna be honest with you here I filmed this tutorial weeks ago and I have been dreading doing the voiceovers because I don't want to read this eyeliner footage just the thought of doing eyeliner gives me hot flashes is that normal I don't think so but here we are and it's not that bad in fact you know what now that I read this dare I say it's actually quite good for me at least I can work with this yeah yeah I can work with this okay so I ran that liner through the lower lash line to create that double winged liner effect and now with a detail eyeshadow brush.

I'm using the burgundy eyeshadow we used on the upper lid to diffuse out this lower liner I'm going to leave this footage up for a few moments so you can really read How I continue to build this up and smoke it out and I'll be right back blog foreign blog okie dokie so I'm finishing up on the details by extending the inner corner with our eyeliner and now I'm using this Too Faced waterproof mascara to run through both the upper and bottom lashes we're going to use falsies today but I like to use mascara beforehand to prevent that gap between her natural lashes and the false lash band for Lashes.
today I'm using a style from Kiss Lashes called Teddy along with a Huda Beauty lash glue and boy do they make a difference I love a good lash and I think these are perfect for this look for brows I'm using the ABH brow Pomade in the shade Ebony and little by little running this through to fill and shape the brow you read because of everything we have going on I don't want to get too crazy with the Brows I think keeping it understated and soft and fluffy is the way to go.
we'll let the eye makeup have its own moment today besides Acacia already has Perfect Brows so I got pretty lucky anyway now heading back to the eye makeup for one last thing I'm using the same bright lilac shade we used in the inner corner and placing it right in that area between the two wings and not only cleans up and sharpens the wing but also ties everything together to begin on the lips I'm using this Mac lip liner in the shade Cork and tracing the borders of her lips with this.
I want to achieve a really soft nude lip so I'm using this with a very light hand to give a subtle hint of definition to her lip border before we apply lipstick and lip gloss for lipstick I'm using this Mac 24-lip color in the shade teaser and popping this right in the center of the lip before diffusing it out for that ombre effect you can do this with a brush you can do this with the lipstick applicator or even your finger whatever you find works best for you for gloss.

I'm using this matte clear lip gloss and applying this right on top in fact you know what I did here what what I did was I mixed some of the lipstick into the clear gloss on the back of my hand which gives us that color we're reading here and what's best about this lip combo in my opinion is that it looks better as it wears the tones mesh together and give this soft worn in effortless kind of vibe now to finish.
I'm using this Urban Decay all-nighter setting spray to set and lock this makeup into place which makes this the final step and how we created this full face of Ulta makeup look on our naturally beautiful model yay you always made me feel okay blog there we have it kids I hope you all enjoyed today's tutorial if you did be sure to give this blog a big old Thumbs Up And subscribe to the blog you can also check out more of my work on my Instagram at painted by Spencer and until next time I'll write you soon.
Other Articles to Read Worthy:
https://astfashion001.blogspot.com/2023/05/these-10-easy-practises-are-enhancing.html
https://astfashion001.blogspot.com/2023/05/ways-to-appear-taller.html
82.https://astfashion001.blogspot.com/2023/05/9-best-and-worst-ways-to-dress-if-you.html
https://astfashion001.blogspot.com/2023/05/dress-haul.html
https://astfashion001.blogspot.com/2023/05/the-tutorial-for-trendy-bold-glamour.html